B-L462E-CELL1/TYPE1SC#
Integrate your B-L462E-CELL1 Discovery kit board along with the TYPE 1SE module with built-in eSIM (ST4SIM-200M).
Prerequisites#
- The B-L462E-CELL1/TYPE1SC board with a Micro-USB cable.
- Installed STM32CubeIDE.
- The serial communication program, such as minicom (for Linux) or RealTerm or PuTTY (for Windows) installed.
- A user with access to the Coiote IoT Device Management platform.
Prepare Anjay client application#
Use an already built binary#
To get the latest binary file and flash it to the board:
- Go to Anjay-freertos-client.
- Download the
Anjay-freertos-client-B-L462E-CELL1-TYPE1SC.binfile. - To flash the board, open your File manager and drag the downloaded
.binfile to your DIS_L462RE external device. - You will see a blinking diode on your board. The diode will stop blinking as soon as the flashing is finished.
Start development using samples#
Note
This step is optional. If you've gone through the Use an already built binary step, you can go to Connect to the LwM2M Server right away.
Clone the Anjay freeRTOS client repository#
Enter the command line interface on your machine and run the following command:
git clone --recursive https://github.com/AVSystem/Anjay-freertos-client
Build binary and flash the board#
- Connect the B-L462E-CELL1/TYPE1SC board to a USB port of your machine.
- Go to the STM32CubeIDE.
- Import the project cloned in the previous step to your workspace:
- From the navigation bar, select File and click Import.
- From the General list, select Existing Projects into Workspace and click Next.
- In Select root directory, indicate the catalog containing the cloned Anjay freeRTOS client repository.
- In the Projects field, select Anjay-freertos-client-B-L462E-CELL1-TYPE1SC and click Finish.

- In the Project Explorer, navigate to the Anjay-freertos-client-B-L462E-CELL1-TYPE1SC project:
- Choose "Debug" configuration and build the project by right-clicking on the project name and selecting Build Project. The build should take less than one minute to complete.
- After the build is finished, right-click on the project name, select Run As and click the 1 STM32 Cortex-M C/C++ Application option.
- In the Lauch Configuration Selection, choose the Anjay-freertos-client-B-L462E-CELL1-TYPE1SC option and click OK.
- After the build and run are complete, the board is flashed with compiled binary.
Connect to the LwM2M Server#
To connect to Coiote IoT Device Management platform, please register at https://eu.iot.avsystem.cloud.
To connect the board, log in to the platform and follow onboarding guide.
Configure the Client#
- With the board still connected to a serial port interface, open your serial communication program.
-
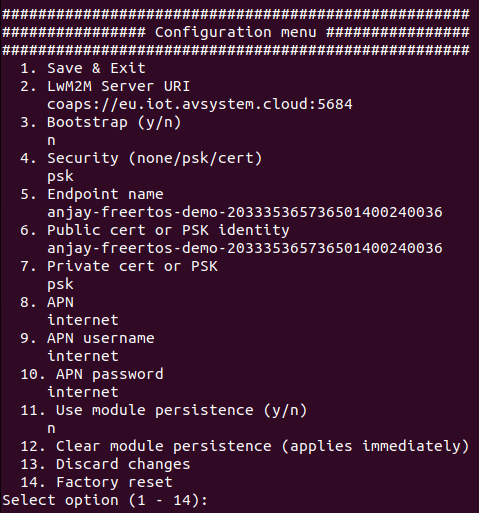
Press the reset button located on the board. This should trigger the following prompt:
Press any key in 3 seconds to enter config menu... -
Press any key and in the configuration menu, change the default credentials to your data by following the instructions presented in the program and save it.

Important
APN (Access Point Name) is the name of a gateway between a GSM, GPRS, 3G and 4G mobile network and another computer network. If you use built-in eSIM card Truphone then change APN to iot.truphone.com.
Note
If you use external SIM card you have to check APN used by SIM card's provider.
-
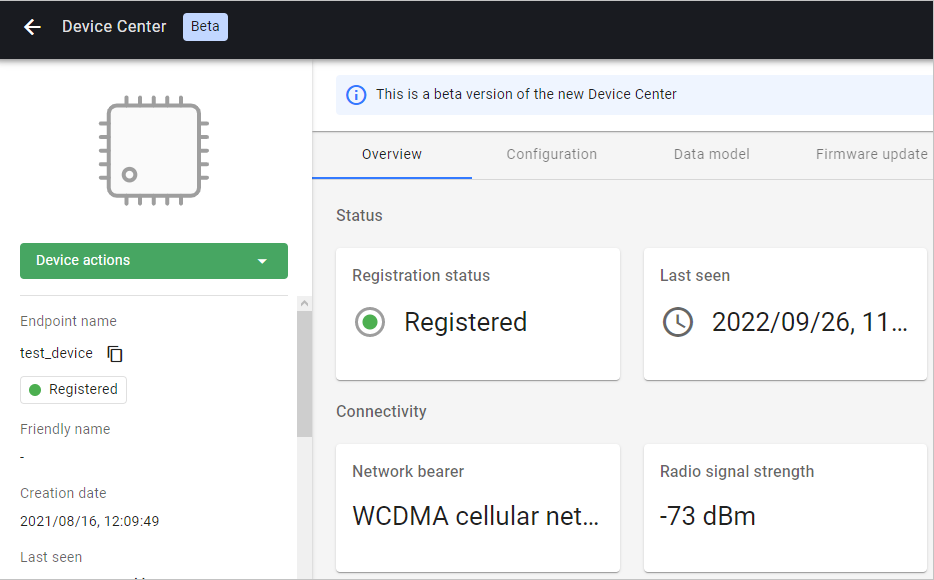
Go to Coiote IoT DM to check if your device is connected. Click Next, then Go to Summary, then Finish. You will see your Device Center view:

Tip
LwM2M Server URI, endpoint name and other information can be found in the Configuration tab.
Anjay-freertos-client with FOTA (Firmware update Over the Air)#
Anjay application can be built in basic version (without FOTA) as described in the Build binary and flash the board section. In order to use FOTA, a few additional steps need to be done, e.g. Secure Boot and Secure Firmware Update compilation.
The X-CUBE-SBSFU Secure Boot and Secure Firmware Update solution allows the update of the STM32 microcontroller built-in program with new firmware versions, adding new features and correcting issues. The update process is performed in a secure way to prevent unauthorized updates and access to confidential on-device data such as code and firmware encryption key.
The Secure Boot (Root of Trust services) is immutable code, always executed after a system reset, that checks STM32 static protections, activates STM32 runtime protections and then verifies the authenticity and integrity of user application code before every execution in order to ensure that invalid or malicious code won't be run.
Additional prerequisites#
- STM32CubeProgrammer installed.
- Support for shell scripts execution (on Windows for example Git or Cygwin can be used).
- Python with the following modules:
pycryptodomex,ecdsa,numpy,pyelftools. - Import B-L462E-CELL1_2_Images_SBSFU and B-L462E-CELL1_2_Images_SECoreBin projects from previously cloned repository to workspace.
Prepare binary with SBSFU#
Important
You need to follow a strict compilation order presented below.
-
Compile SECoreBin application
This step is needed to create the Secure Engine core binary including all the trusted code and keys mapped inside the protected environment. The binary is linked with the SBSFU code in step 2. -
Compile SBSFU application
This step compiles the SBSFU source code implementing the state machine and configuring the protections. In addition, it links the code with the SECore binary generated at step 1 in order to generate a single SBSFU binary including the SE trusted code. -
Compile UserApp application (set Build configuration to Release)
It generates:- The user application binary file that is uploaded to the device using the Secure Firmware Update process
(Projects/B-L462E-CELL1/UserApp/Binary/Anjay-freertos-client-B-L462E-CELL1-TYPE1SC.sfb). - A binary file concatenating the SBSFU binary, the user application binary in clear format, and the corresponding
FW header
(Projects/B-L462E-CELL1/UserApp/Binary/SBSFU_Anjay-freertos-client-B-L462E-CELL1-TYPE1SC.bin).
Tip
You can set a custom firmware version in the
Application/Inc/default_config.hfile (usingFIRMWARE_VERSIONdefine). It will be useful when performing FOTA to distinguish the firmware images from each other. - The user application binary file that is uploaded to the device using the Secure Firmware Update process
Flash the board with SBSFU binary#
Use STM32CubeProgrammer application with SBSFU_Anjay-freertos-client-B-L462E-CELL1-TYPE1SC.bin file to program the board (it is advisable to perform Full chip erase first). You can open serial port to change default credentials in order to connect to Coiote IoT DM.
After that, you can use Coiote IoT DM to perform firmware update with Anjay-freertos-client-B-L462E-CELL1-TYPE1SC.sfb file.
Important
Disable Secure Protection
When flashed board with Secure Boot you will need to switch off secure protection to be able to flash the board again. To deactivate secure application please run STM32_Programmer_CLI (Program provided with STM32CubeProgrammer) tool with specific options:
./< path_to_STM32_Programmer_CLI > -c port=SWD mode=UR -ob RDP=0xAA \
    WRP1A_STRT=0xFF WRP1A_END=0x0 WRP1B_STRT=0xFF WRP1B_END=0x0 \
    -ob displ
Perform firmware update#
In order to perform firmware update:
- Build the application and flash the board with
FIRMWARE_UPDATEdefine set to the proper version (see Prepare binary with SBSFU step), e.g.#define FIRMWARE_VERSION "v1.0" - Make changes to the code (optionally), set
FIRMWARE_UPDATEdefine to a different version, e.g.and build the application with a new firmware.#define FIRMWARE_VERSION "v2.0" - Upload the generated firmware file (
Anjay-freertos-client-B-L462E-CELL1-TYPE1SC.sfb) to Coiote IoT DM (go to Device management and selectFirmware update) and clickUpgrade. - After the FOTA finishes, the device will reboot and the following log should appear:
where
Firmware updated from version 'v1.0' to 'v2.0'v1.0andv2.0will be set to firmware versions you set earlier.
Next steps#
If you want to develop your own LwM2M-enabled application based on STM32 B-L462E-CELL1/TYPE1SC, check Anjay-freertos-client and start prototyping!