Runtime Certificate and Private Key Configuration#
Introduction#
Anjay library supports secure connection between device and server. Encryption can be achieved with the use of Pre-Shared Key as it was described in STM32L496G-DISCO/BG96, B-L462E-CELL1/TYPE1SC, B-L475E-IOT01A, and B-U585I-IOT02A/BG96 pages or with certificate-based cryptography.
In Certificate Mode an asymmetrical algorithm is used to authenticate the connection endpoints and initialize payload encryption. Appropriate certificates need to be generated for both the LwM2M Client and the LwM2M Server. Public certificates of both parties are mutually available, and each party also has access to its corresponding private key.
You can read more about secure communication on Anjay's documentation page.
Prerequisites#
- The STM32L496G-DISCO/BG96 board with a USB cable.
- Installed minicom (for Linux), RealTerm, PuTTy (for Windows), or another serial communication program.
- Installed OpenSSL
- An active Coiote IoT DM user account.
Note
In this tutorial we will use the STM32L496G-DISCO/BG96 board as an example.
Flash the device#
To get the latest binary file and flash the board:
- Connect the STM32L496G-DISCO/BG96 board to a USB port of your machine.
- Go to Anjay-freertos-client.
- Download the
Anjay-freertos-client-STM32L496G-BG96.binfile. - To flash the board, open your File manager and drag the downloaded
.binfile to your DIS_L496ZG external device. - You will see a blinking diode on your board. The diode will stop blinking as soon as the flashing is finished.
Generate certificate#
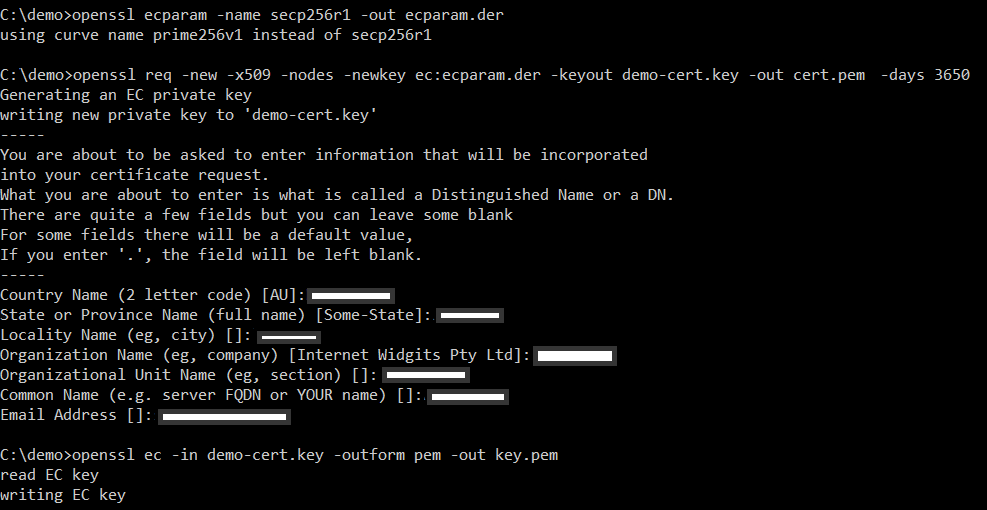
The certificate and private key based on the SECP256R1 curve can be provided through the shell interface in PEM format. To generate a self-signed certificate and key pair open a terminal and use the following commands.
openssl ecparam -name secp256r1 -out ecparam.der
openssl req -new -x509 -nodes -newkey ec:ecparam.der -keyout demo-cert.key -out cert.pem -days 3650
openssl ec -in demo-cert.key -outform pem -out key.pem
Important
To use the certificate and private key configuration with Coiote IoT DM you must specify a common name that is the same as the client endpoint name.
You will see two files cert.pem and key.pem created in the directory.
Configure the Client#
- With the board still connected to a serial port interface, open a serial communication program.
-
Press the reset button located on the board. This should trigger the following prompt:
Press any key in 3 seconds to enter config menu... -
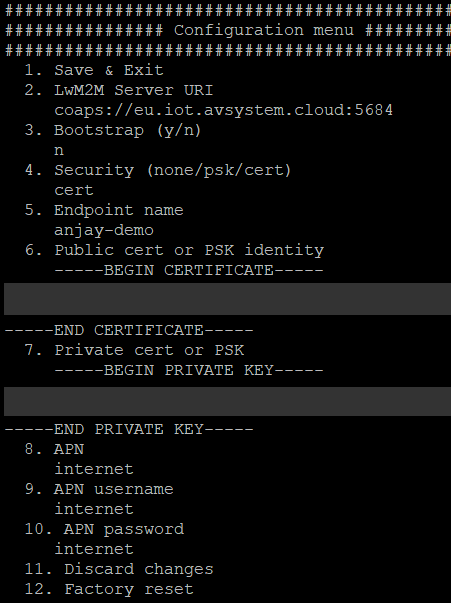
Press any key and in the configuration menu, change the default credentials to your data by following the instructions presented below:
- Set 4. Security (none/psk/cert) to
cert. - Set 5. Endpoint name to your board endpoint name, e.g.
anjay-demo. - Set 6. Public cert or PSK identity and paste your generated certificate from
cert.pemfile. - Set 7. Private cert or PSK and paste your generated certificate private key from
key.pemfile. - Set 8. APN, 9. APN username, and 10. APN password to compatibile with your SIM card.
Important
APN (Access Point Name) is the name of a gateway between a GSM, GPRS, 3G and 4G mobile network and another computer network. If you use built-in Truphone SIM card then change APN to iot.truphone.com.
Note
If you use external SIM card you have to check APN used by SIM card's provider.
- Set 4. Security (none/psk/cert) to
-
Save changes by clicking 1. Save & Exit, and go to the next step to add a device to Coiote IoT DM.
Add device to Coiote IoT DM#
-
Upon logging in to Coiote IoT DM for the first time, you will see the Add your LwM2M device panel.
Note
If you had previously added a device, in Device inventory, click the Add device button.
-
Select the Connect your LwM2M device directly via the Management server tile.

-
In the Device credentials step:
- In the Endpoint name enter your LwM2M device endpoint name, e.g.
anjay-demo.
Note
The Endpoint name should be the same as it is in the Client configuration.
- In the Security mode section, select Certificate mode.

- Click Upload a new certificate and Browse.
- In the pop-up, go to the directory where your certificate has been generated, select the
cert.pemfile and click Open. - Click Add device.
- In the Endpoint name enter your LwM2M device endpoint name, e.g.
-
Click Next, Go to Summary to skip the third step, and Finish to see your Device Center.
