Exercise 3A: Implement the Time Object#
In this exercise, we are implementing the Time Object /3333 using LwM2M version 1.0. With only 3 Resources, it is one of the simplest Objects defined in the OMA LwM2M Registry. The Object allows LwM2M Clients to report the current time in seconds since January 1, 1970, UTC.
The Time Object contains three Resources as shown in the table below.
| ID | Name | Operations | Mandatory | Type | Description |
|---|---|---|---|---|---|
| 5506 | Current Time | RW | Mandatory | Time | Unix Time. A signed integer representing the number of seconds since Jan 1st, 1970 in the UTC time zone. |
| 5507 | Fractional Time | RW | Optional | Float | A fractional part of the time when sub-second precision is used (e.g., 0.23 for 230 ms). |
| 5750 | Application Type | RW | Optional | String | The application type of the sensor or actuator as a string depending on the use case. This description identifies Instance (e.g. description indicating the time comes from GPS, internal server clock, or another source) |
Explanation of table rows:
- ID - number used to identify the particular Resource.
- Operations - RW indicates that the Resource is Readable and Writable (the third possible option is E - Executable).
- Mandatory - not all Resources must be implemented to comply with the specification. In this case, only the Current Time Resource is mandatory.
Note
Current Time and Fractional Time Resources are writable, but for this exercise, we will only focus on implementing the read operation for these two resources.
With our Time Object we will initiate one Instance, implement the read and write functions, make the device responsive to server read commands, and make the Object register to the server at boot.
Prerequisites#
- A Raspberry Pi Pico W board with a USB cable
- Installed minicom (for Linux), RealTerm, PuTTy (for Windows), or another serial communication program.
- Python
- An active Coiote IoT DM user account.
- Completed exercise 2B from module 2
Implement the Time Object#
Let’s get started by going to the Anjay-pico-client directory and creating a new directory called time_object. Go to the directory and start by generating the Object's implementation.
Important
Copy and paste the main.c and CMakeLists.txt files from the Anjay-pico-client/secure_communication directory to the Anjay-pico-client/time_object directory.
Generate base source code#
To generate a layout of the Object’s implementation, we will use the anjay_codegen.py and lwm2m_object_registry.py scripts which are bundled with the Anjay library. The script downloads the LwM2M Object Definition and generates a skeleton of the LwM2M Object code, requiring you to only fill in actual Object logic. For more information about the script, visit the Anjay documentation.
If you’re using Linux or MacOS go to the Anjay-pico-client directory, and run the following commands in your command line:
python3 deps/anjay/tools/lwm2m_object_registry.py --get-xml 3333 -v 1.0 > time_object/lwm2m_3333.xml
python3 deps/anjay/tools/anjay_codegen.py -i time_object/lwm2m_3333.xml -o time_object/time_object.c
Important
If you’re using Windows, use python instead of python3.
The commands use the anjay_codegen.py and lwm2m_object_registry.py scripts to generate the lwm2m_3333.xml and time_object.c files in the Anjay-pico-client/time_object.
The generated files still require some modifications to make them operational. In the next part, you can find the highlighted code blocks which should be added to the time_object.c files.
Instance and Object state#
Each Object requires at least one Object Instance which contains all the required Resources.
Go to the Anjay-pico-client/time_object directory and open the file time_object.c.
Start by adding some variables responsible for the state of our Time Object Instance to the time_instance_t structure. For this add a value of Application Type Resource because Current Time Resource will be using a system clock source directly, whenever a read handler is called.
Note
There is also a second array for keeping a backup of the Application Type - this will be required for the implementation of transactions. We will get back to it at the end of this exercise.
time_object.c
typedef struct time_instance_struct {
    anjay_iid_t iid;
    char application_type[64];
    char application_type_backup[64];
} time_instance_t;

typedef struct time_object_struct {
        const anjay_dm_object_def_t *def;
        AVS_LIST(time_instance_t) instances;
} time_object_t;
Initiate, release, and reset the Instance#
Next up is implementing the init_instance() and release_instance() functions. These functions are used during the creation and deletion of Instances, usually performed through device work.
In this case, all we have to do is initialize the Application Type with some value. We can do this by setting the first byte of time_instance_t::application_type variable to \0.
Note
To better understand the code, it is useful to know the “full names” of some variables:
- obj - Object
- iid - Instance ID
- rid - Resource ID
- riid - Resource Instance ID
time_object.c
static int init_instance(time_instance_t *inst, anjay_iid_t iid) {
    assert(iid != ANJAY_ID_INVALID);

    inst->iid = iid;
    inst->application_type[0] = '\0';
    return 0;
}
The next function to implement is instance_reset() which resets the Instance to its default state. In our case, this means we clear the Application Type.
time_object.c
static int instance_reset(anjay_t *anjay,
                        const anjay_dm_object_def_t *const *obj_ptr,
                        anjay_iid_t iid) {
    (void) anjay;

    time_object_t *obj = get_obj(obj_ptr);
    assert(obj);
    time_instance_t *inst = find_instance(obj, iid);
    assert(inst);
    inst->application_type[0] = '\0';
    return 0;
}
We can also disable the presence of one of the Resources in the list_resources() function. It is done by changing ANJAY_DM_RES_PRESENT to ANJAY_DM_RES_ABSENT in the anjay_dm_emit_res() call. This change will simplify the implementation of the Read Handler and Observe/Notifications support in the next section.
time_object.c
static int list_resources(anjay_t *anjay,
                        const anjay_dm_object_def_t *const *obj_ptr,
                        anjay_iid_t iid,
                        anjay_dm_resource_list_ctx_t *ctx) {
    (void) anjay;
    (void) obj_ptr;
    (void) iid;

    anjay_dm_emit_res(ctx, RID_CURRENT_TIME,
                    ANJAY_DM_RES_RW, ANJAY_DM_RES_PRESENT);
    anjay_dm_emit_res(ctx, RID_FRACTIONAL_TIME,
                    ANJAY_DM_RES_RW, ANJAY_DM_RES_ABSENT);
    anjay_dm_emit_res(ctx, RID_APPLICATION_TYPE,
                    ANJAY_DM_RES_RW, ANJAY_DM_RES_PRESENT);
    return 0;
}
Note
Using the -r command line option in anjay_codegen.py you can generate Object’s stub with specified Resources only. You can run
python3 deps/anjay/tools/anjay_codegen.py --help from the Anjay-pico-client direcotry for more help.
Read and Write handlers#
Now we are ready to implement resource_read() and resource_write() handlers. These handlers will be called every time LwM2M Server performs a Read or Write operation on the Time Object.
Note
Read and Write operations will be described in more detail in the next module: Module 4 - Device Management using LwM2M.
The resource_read() operation on Current Time resource should return current time in seconds since January 1, 1970, UTC. To get this value, we can use the preimplemented avs_time_real_now() function. The same operation on Application Type resource should return the time_instance_t::application_type string. Because we’ve made the Fractional Time resource absent, we won’t perform any actions on this resource during resource_read() operation.
time_object.c
static int resource_read(anjay_t *anjay,
const anjay_dm_object_def_t *const *obj_ptr,
anjay_iid_t iid,
anjay_rid_t rid,
anjay_riid_t riid,
anjay_output_ctx_t *ctx) {
(void) anjay;
time_object_t *obj = get_obj(obj_ptr);
assert(obj);
time_instance_t *inst = find_instance(obj, iid);
assert(inst);
switch (rid) {
case RID_CURRENT_TIME: {
assert(riid == ANJAY_ID_INVALID);
int64_t timestamp;
if (avs_time_real_to_scalar(×tamp, AVS_TIME_S,
avs_time_real_now())) {
return -1;
}
return anjay_ret_i64(ctx, timestamp);
}
case RID_APPLICATION_TYPE:
assert(riid == ANJAY_ID_INVALID);
return anjay_ret_string(ctx, inst->application_type);
default:
return ANJAY_ERR_METHOD_NOT_ALLOWED;
}
}
As discussed, we only implement the Read operation on the Current Time Resource, so the Write operation is only implemented on the Application Type Resource.
time_object.c
static int resource_write(anjay_t *anjay,
                        const anjay_dm_object_def_t *const *obj_ptr,
                        anjay_iid_t iid,
                        anjay_rid_t rid,
                        anjay_riid_t riid,
                        anjay_input_ctx_t *ctx) {
    (void) anjay;

    time_object_t *obj = get_obj(obj_ptr);
    assert(obj);
    time_instance_t *inst = find_instance(obj, iid);
    assert(inst);

    switch (rid) {
    case RID_APPLICATION_TYPE:
        assert(riid == ANJAY_ID_INVALID);
        return anjay_get_string(ctx, inst->application_type,
                                sizeof(inst->application_type));
    default:
        return ANJAY_ERR_METHOD_NOT_ALLOWED;
    }
}
Initialize the Object#
There is one function left to implement: time_object_create(). This function uses add_instance() to create an Object Instance, allowing data to be read by the LwM2M Server.
time_object.c
const anjay_dm_object_def_t **time_object_create(void) {
    time_object_t *obj = (time_object_t *) avs_calloc(1, sizeof(time_object_t));
    if (!obj) {
        return NULL;
    }
    obj->def = &OBJ_DEF;

    time_instance_t *inst = add_instance(obj, 0);
    if (!inst) {

        avs_free(obj);
        return NULL;
    }
    strcpy(inst->application_type, "Clock 0");
    return &obj->def;
}
Register the Object in Anjay#
The last thing to do is to create the header file time_object.h for the implemented object, include the header file in the main.c and update the CMakeLists.txt file.
time_object.h
#pragma once

#include <anjay/dm.h>

const anjay_dm_object_def_t **time_object_create(void);
void time_object_release(const anjay_dm_object_def_t **def);
main.c
void anjay_task(__unused void *params) {
    init_wifi();

    anjay_configuration_t config = {
        .endpoint_name = ENDPOINT_NAME,
        .in_buffer_size = 2048,
        .out_buffer_size = 2048,
        .msg_cache_size = 2048,
    };

    if (!(g_anjay = anjay_new(&config))) {
        avs_log(main, ERROR, "Could not create Anjay object");
        exit(1);
    }
    if (setup_security_object() || setup_server_object()) {
        avs_log(main, ERROR, "Failed to initialize basic objects");
        exit(1);
    }
    const anjay_dm_object_def_t **time_object = time_object_create();
    if (!time_object || anjay_register_object(g_anjay, time_object)) {
        avs_log(main, WARNING, "Failed to initialize time object");
    }

    main_loop();
    time_object_release(time_object);
    anjay_delete(g_anjay);
}
Include the time_object.h file on the top of the main.c file.
time_object.c
#include <avsystem/commons/avs_list.h>
#include <avsystem/commons/avs_log.h>
#include <avsystem/commons/avs_prng.h>
#include <avsystem/commons/avs_time.h>

#include "time_object.h"

#ifndef RUN_FREERTOS_ON_CORE
#    define RUN_FREERTOS_ON_CORE 0
#endif
CMakeLists.txt
cmake_minimum_required(VERSION 3.13)

add_executable(time_object
               main.c
               time_object.c
               time_object.h
               )

target_link_libraries(time_object
                      pico_stdlib
                      anjay-pico
                      FreeRTOS
                      )

target_include_directories(time_object PRIVATE
                           ${COMMON_DIR}/config
                           )

target_compile_definitions(time_object PRIVATE
                           WIFI_SSID=\"${WIFI_SSID}\"
                           WIFI_PASSWORD=\"${WIFI_PASSWORD}\"
                           ENDPOINT_NAME=\"${ENDPOINT_NAME}\"
                           PSK_IDENTITY=\"${PSK_IDENTITY}\"
                           PSK_KEY=\"${PSK_KEY}\"
                           )
pico_enable_stdio_usb(time_object 1)
pico_enable_stdio_uart(time_object 0)

pico_add_extra_outputs(time_object)
At the end of the file add the mention about subdirectory to the general CMakeLists.txt.
Anjay-pico-client/CMakeLists.txt
add_subdirectory(time_object)
Now the client is ready to be built and connected to LwM2M Server, allowing it to read the Time object.
Support transactional writes#
Consider the following scenario: the LwM2M Server tries to write to two or more Resources simultaneously. The write-on Application Type will probably succeed, but we are sure that writing at the Current Time will fail as we didn’t implement this Write operation. Without supporting transactions, the entire Write operation will fail.
By default, transaction handlers are set to anjay_dm_transaction_NOOP and do nothing. To properly support Writes on the O two handlers: transaction_begin which makes a backup of the Application Type value, and transaction_rollback which reverts the Application Type to its initial value (before the Write operation is performed) for which we need the time_instance_t::application_type_backup array.
Go back to the time_object.c file and update the file using the following code block:
time_object.c
static int transaction_begin(anjay_t *anjay,
                             const anjay_dm_object_def_t *const *obj_ptr) {
    (void) anjay;
    time_object_t *obj = get_obj(obj_ptr);
    time_instance_t *element;
    AVS_LIST_FOREACH(element, obj->instances) {
        strcpy(element->application_type_backup, element->application_type);
    }
    return 0;
}

static int transaction_rollback(anjay_t *anjay,
                                const anjay_dm_object_def_t *const *obj_ptr) {
    (void) anjay;
    time_object_t *obj = get_obj(obj_ptr);
    time_instance_t *element;
    AVS_LIST_FOREACH(element, obj->instances) {
        strcpy(element->application_type, element->application_type_backup);
    }
    return 0;
}
static const anjay_dm_object_def_t OBJ_DEF = {
    .oid = 3333,
    .handlers = {
        .list_instances = list_instances,
        .instance_create = instance_create,
        .instance_remove = instance_remove,
        .instance_reset = instance_reset,

        .list_resources = list_resources,
        .resource_read = resource_read,
        .resource_write = resource_write,

        .transaction_begin = transaction_begin,
        .transaction_validate = anjay_dm_transaction_NOOP,
        .transaction_commit = anjay_dm_transaction_NOOP,
        .transaction_rollback = transaction_rollback
    }
};
Recompile the application and flash the board#
To recompile the application, go to the Anjay-pico-client/build directory.
If you’re using Linux or Mac, run the following command:
cmake -DCMAKE_BUILD_TYPE=Debug -DWIFI_SSID="<ssid>" -DWIFI_PASSWORD="<pass>" -DENDPOINT_NAME="<endpoint_name>" -DPSK_IDENTITY="<identity>" -DPSK_KEY="<psk>" ..
If you’re using Windows, run the following command:
cmake -DCMAKE_BUILD_TYPE=Debug -DWIFI_SSID="<ssid>" -DWIFI_PASSWORD="<pass>" -DENDPOINT_NAME="<endpoint_name>" -DPSK_IDENTITY="<identity>" -DPSK_KEY="<psk>" .. -G "MinGW Makefiles"
cmake --build . -j
Program your board using the bootloader. Press and hold the BOOTSEL button while connecting the device through a USB cable - it should be recognized as a Mass Storage device.
In the build/time_object directory, you will find the .uf2 file which has our added changes.
Copy the time_object.uf2 file to the Mass Storage device directory, and wait until the process finishes - copying the firmware image may take a while.
Check the logs#
With the board still connected to your PC, open a serial communication program. This will help you to check if everything is working correctly.

If all went well and logs show registration successfully updated, you can go to Coiote IoT Device Management platform where the Registration status should show Registered. Go to the Data Model and check if you can see the Time Object in the Defined objects section.
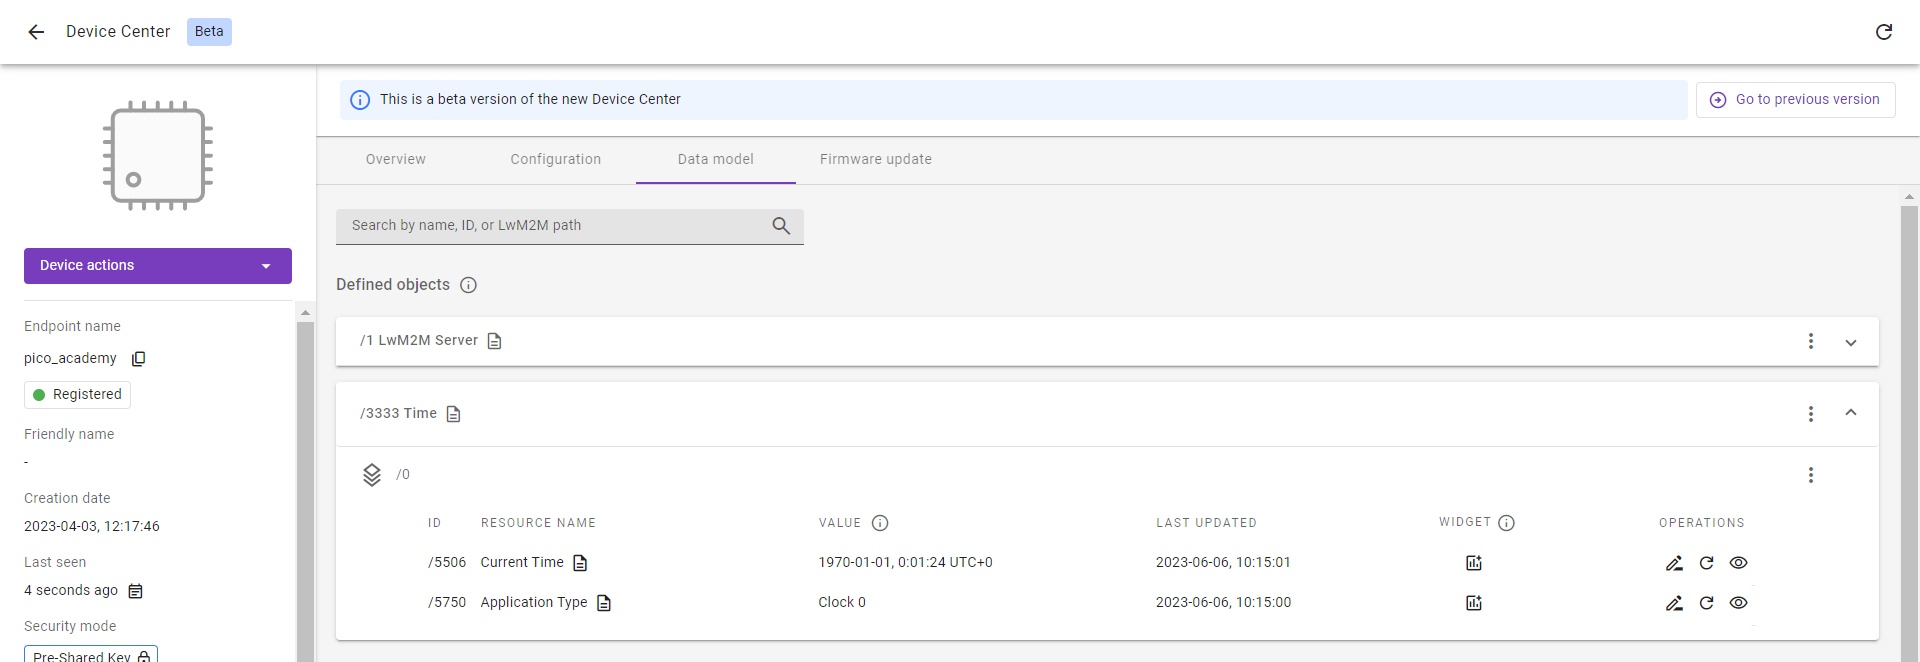
Note
The Object allows LwM2M Clients to report the current time in seconds since January 1, 1970, UTC. After refreshing the page you can see that the value changed.
Good job! 👏👏 Now you are ready to create more difficult Objects. For this, go to the next exercise.
Provide your feedback
We're constantly working on improving the LwM2M Academy. Please share with us your feedback about this module so we can create an even better learning experience.