Exercise 2B: Implement Pre-Shared Key Security Mode#
In this exercise, we will change the security mode from No-Sec to Pre-Shared Key (PSK). In this mode, communication is symmetrically encrypted and authenticated using the same secret key (password), shared between the server and the client.
Prerequisites#
- A Raspberry Pi Pico W board with a USB cable.
- Completed exercise 1 from module 1.
- Completed exercise 2A from module 2.
- Installed minicom (for Linux), RealTerm, PuTTy (for Windows), or another serial communication program.
- An active Coiote IoT DM user account.
Connect to the LwM2M Server#
For LwM2M Servers like Coiote IoT DM, server-side configuration needs to be updated to enable LwM2M Clients to connect using PSK. The simplest solution is to edit the connection parameters on the Coiote IoT Device Management platform configuration page. Follow the next steps to change the parameters and set them to Pre-Shared Key mode.
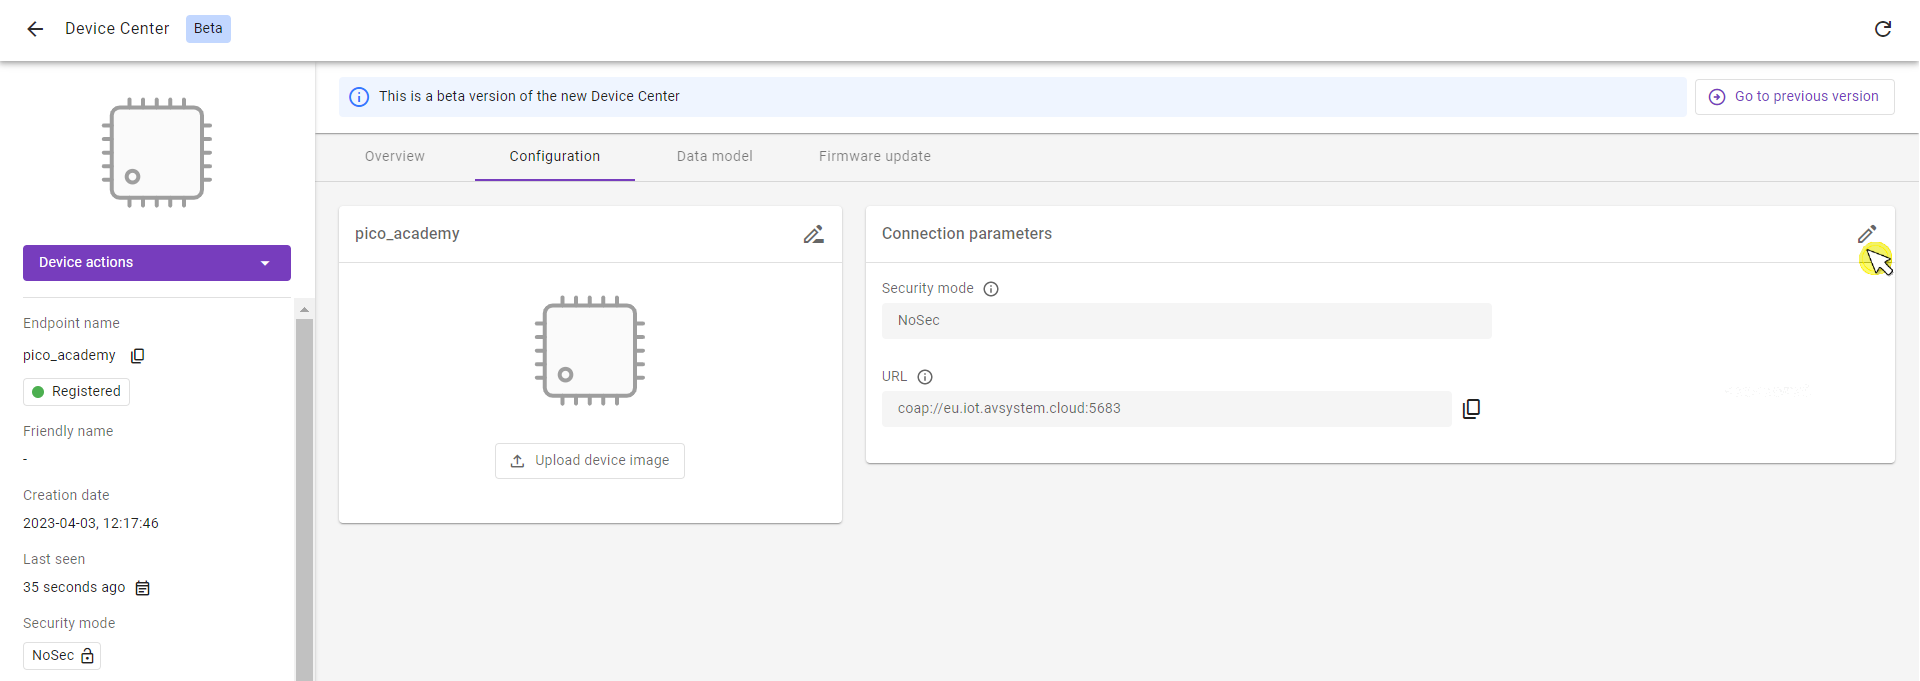
Change connection parameters#
- Log in to Coiote IoT DM: https://eu.iot.avsystem.cloud.
- Select Device Inventory from the left-side menu.
- From the Device Inventory, go to your created device.
-
Go to the Configuration page and click the right pencil icon on the Connection parameters panel.
-
Update Connection parameters:
- In the Security mode section, select the Pre-Shared Key mode:
- In the Key identity field, it’s recommended to provide the same value as in the Endpoint name field.
- In the Key field, create the shared secret used for device-server authentication. During the compilation step you will provide the PSK_KEY which must have the same value as the Key.

Warning
Nowadays it’s easy to guess simple human-generated passwords. Generating a password using a combination of alphanumeric characters and special symbols ensures its security. Avoid putting your personal information and generate a combination of keys to help you maximize safety and security.
Click the Save button and confirm the changes.
Configure credentials in application sources#
Let’s get started by going to the Anjay-pico-client directory and creating a new directory called psk-mode.
Important
Copy and paste the main.c and CMakeLists.txt files from the Anjay-pico-client/mandatory_objects directory into the Anjay-pico-client/psk-mode directory.
Open the main.c file in a code editor (e.g. VS Code).
In this file, modify the setup_security_object() function to change Anjay’s security settings and add the configuration of PSK-based encryption. This can be done using the code below.
main.c
static int setup_security_object() {
    if (anjay_security_object_install(g_anjay)) {
        return -1;
    }

    static const char psk_identity[] = PSK_IDENTITY;
    static const char psk_key[] = PSK_KEY;

    const anjay_security_instance_t security_instance = {
        .ssid = 1,
        .server_uri = "coaps://eu.iot.avsystem.cloud:5684",
        .security_mode = ANJAY_SECURITY_PSK,
        .public_cert_or_psk_identity = (const uint8_t *) psk_identity,
        .public_cert_or_psk_identity_size = strlen(psk_identity),
        .private_cert_or_psk_key = (const uint8_t *) psk_key,
        .private_cert_or_psk_key_size = strlen(psk_key)
    };

    anjay_iid_t security_instance_id = ANJAY_ID_INVALID;
    if (anjay_security_object_add_instance(g_anjay, &security_instance,
                                        &security_instance_id)) {
        return -1;
    }
    return 0;
}
Next, open the CMakeLists.txt, change the file names and add the required information about the PSK mode.
CMakeLists.txt
cmake_minimum_required(VERSION 3.13)

add_executable(psk-mode
               main.c
               )

target_link_libraries(psk-mode
                      pico_stdlib
                      anjay-pico
                      FreeRTOS
                      )

target_include_directories(psk-mode PRIVATE
                           ${COMMON_DIR}/config
                           )

target_compile_definitions(psk-mode PRIVATE
                           WIFI_SSID=\"${WIFI_SSID}\"
                           WIFI_PASSWORD=\"${WIFI_PASSWORD}\"
                           ENDPOINT_NAME=\"${ENDPOINT_NAME}\"
                           PSK_IDENTITY=\"${PSK_IDENTITY}\"
                           PSK_KEY=\"${PSK_KEY}\"
                           )

pico_enable_stdio_usb(psk-mode 1)
pico_enable_stdio_uart(psk-mode 0)

pico_add_extra_outputs(psk-mode)
At the end of the file add the mention about subdirectory to the general CMakeLists.txt.
Anjay-pico-client/CMakeLists.txt
add_subdirectory(psk-mode)
Now the client is ready to be built and connected to LwM2M Server, allowing it to read the Time object.
Important
Be aware that the Anjay-pico-client/CMakeLists.txt and Anjay-pico-client/psk-mode/CMakeLists.txt are two different files.
Tip
Need help? Head over to the lwm2m-academy channel on Discord to get in touch with our experts.
Configure PSK Identity and Pre-Shared Key#
After updating the setup_security_object() function in the main.c file, it is time to describe the most important variables to configure the PSK mode.
- PSK Identity (
PSK_IDENTITY) is the name by which the device identifies itself during the DTLS handshake. It is recommended to use the endpoint name as the Key identity. - PSK Key (
PSK_KEY) is the shared secret (password) the device uses for server connections in PSK mode. You must enter this PSK Key in plain text. - Server URI (
server_uri) points to the LwM2M Server. Note that the URI port has changed from5683to5684.
Note
The complete code for a similar example targeting desktop platforms can be found in the secure_communication subdirectory of the Anjay-pico-client project repository.
Recompile the application and flash the board#
To recompile the application, go to the Anjay-pico-client/build directory.
If you’re using Linux or Mac, run the following command:
cmake -DCMAKE_BUILD_TYPE=Debug -DWIFI_SSID="<ssid>" -DWIFI_PASSWORD="<pass>" -DENDPOINT_NAME="<endpoint_name>" -DPSK_IDENTITY="<identity>" -DPSK_KEY="<psk>" ..
If you’re using Windows, run the following command:
cmake -DCMAKE_BUILD_TYPE=Debug -DWIFI_SSID="<ssid>" -DWIFI_PASSWORD="<pass>" -DENDPOINT_NAME="<endpoint_name>" -DPSK_IDENTITY="<identity>" -DPSK_KEY="<psk>" .. -G "MinGW Makefiles"
cmake --build . -j
Program your board using the bootloader. Press and hold the BOOTSEL button while connecting the device through a USB cable - it should be recognized as a Mass Storage device.
In the build/psk-mode directory, you will find the .uf2 file which contains the added changes.
Copy the psk-mode.uf2 file to the Mass Storage device directory, and wait until the process finishes - copying the firmware image may take a while.
Check the logs#
If all went well and logs show registration successfully updated.

In Coiote IoT Device Management platform, the Registration status should show Registered and the Security mode in the bottom-left corner panel should now include the tag: Pre-Shared Key.
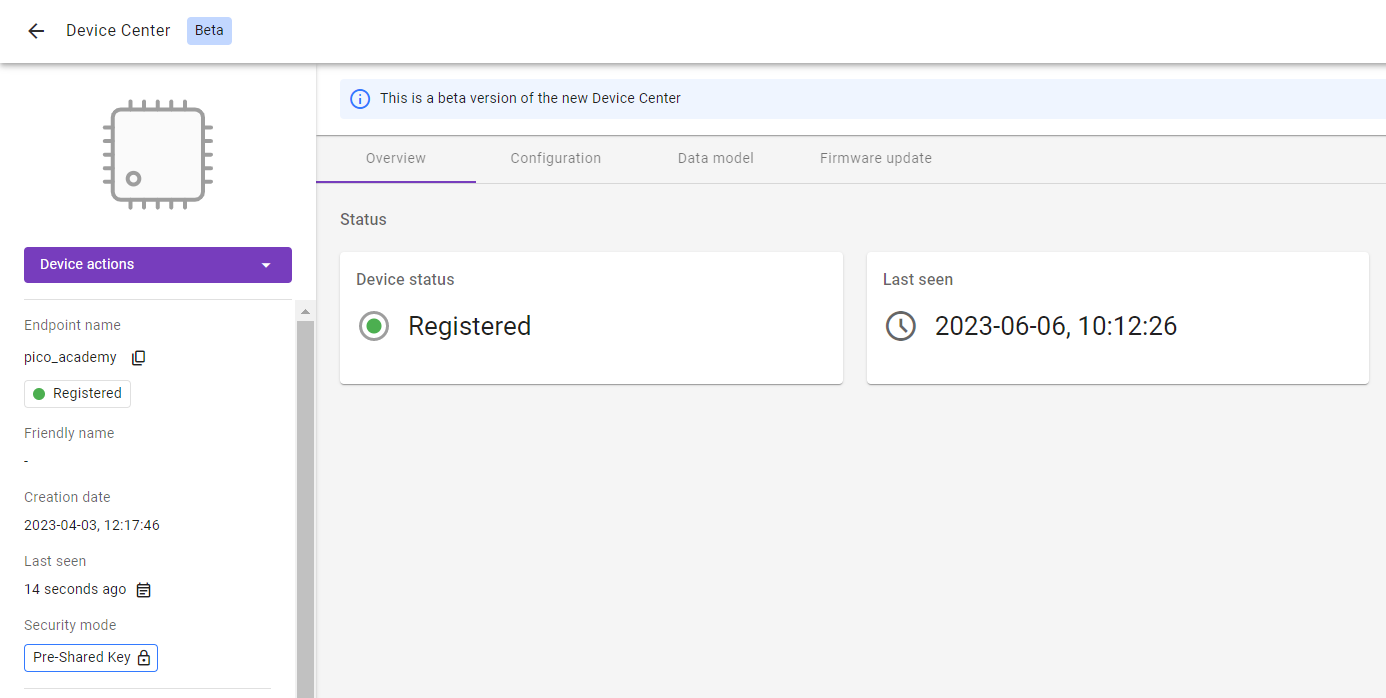
Can you see Registered in the registration status and the tag Pre-Shared Key? If yes, well done! 👏 👏
Provide your feedback
We're constantly working on improving the LwM2M Academy. Please share with us your feedback about this module so we can create an even better learning experience.